How I attached a bathroom shelf on tiled walls without any drilling
Our bathroom has plenty of net space, but its layout is so awkward that there’s no real room for a proper shelf around the sink or anywhere else, really. My girlfriend needed more space for her bathroom essentials and so we brainstormed ways to make that possible. We landed on the idea to install a wooden shelf in the corner, above the washing machine.
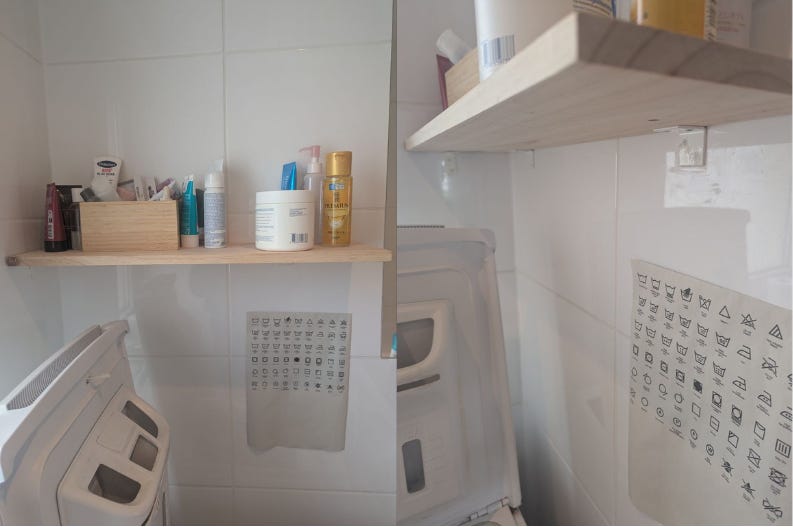
The final result
After a couple iterations, I found a way to build a beautiful, stable, and fully removable shelf, crucially without drilling any holes into our bathroom tiles.
A simple wooden board, attached to steel brackets glued to the wall. It’s a great use of the space above the washing machine that was completely unused before, enough space for all the things my girlfriend wants to place.
I’m very happy with the result!
Evolving the approach
I did a lot of research to figure out how to accomplish what we wanted: a mounted shelf to the tiled wall strong enough to hold itself plus around 5kg of weight, able to handle the humid bathroom environment, and most importantly: reversible. I didn’t want to drill into the tiles and needed a way to dismount everything easily in case we move out.
When I explained my idea to the staff in a DIY store, they weren’t encouraging and dismissed the idea. They told me it wouldn’t work and this would likely damage the tiles, plus the board I had in mind wasn’t suitable for this kind of mounting according to them. I got upset and doubted myself and this approach completely.
But after lots of googling and consultations with ChatGPT, I moved through with my initial approach: using mounting adhesive to glue a board against the tiles.
After getting the glue and the board and seeing things in practice, I wasn’t sure if the glue alone would be enough to hold the board in place. I was looking for a more “incremental” approach and for a construction that would provide more stability and could carry more weight. This is when I added steel brackets into the mix, leading to my final plan:
glue the steel brackets to the tiles in level, let them dry for 24h
screw the board onto the brackets
tada!
Using steel brackets allowed an incremental approach, distributes the load more evenly and provides much better stability. Win! I am not sure how easy the eventual dismantling will be, but my research tells me that using a hair dryer and a box cutter will lead to success. We’ll see.
Materials
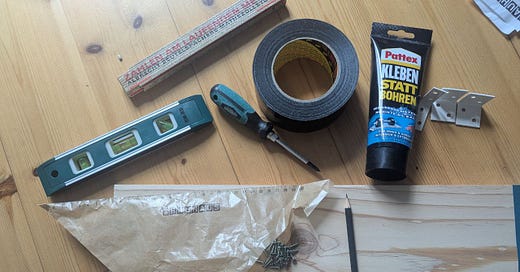
Well, in execution stuff happened and I had to adapt… here’s a final list of all the material I ended up using, along with notes on their function. It was about 30€ in total, plus a couple standard tools and materials I have around anyway.
the wooden board: of course, the heart of it all! We chose pine wood for its great looks and light weight. We got two pieces for 16€.
special mounting adhesive for humid environments: “Kleben statt Bohren” a product line from Pattex, means gluing instead of drilling. We got the “water-resistant” version which was 9€, smaller sizes are available as well and would have been enough.
a couple pieces of steel brackets: these made the installation and future removal much easier. I wanted 3 per board, 1 slim and 2 square pieces, makes a total of 6 pieces for about 5€.
screwdriver + screws: Our boards are 15mm thick and I’ve used 13mm long screws. You can actually use 15mm long screws (some mms will be “eaten” from the screw head that sits on top of the board, plus the steel bracket), but I went with the 13mm to ensure the wood doesn’t burst. 2 screws per steel bracket, 6 steel brackets… I needed 12 screws, and the minimum of 20g (maybe ~50 screws) was only 71 Cents.
water level, rule, pencil: for precision and marking 😎
gaffer tape (optional): helped hold the brackets in place while the glue dried. Highly recommended!
drill with wood bits (optional): pre-drilling the wood makes the screw installation easier and cleaner. wood bits are ideally ~1mm less in diameter than the screws.
The process (step-by-step)
1. Positioning
Decide exactly where the board should go. Use a water level to make sure everything is straight. Hold the board in place and mark the position of the steel brackets on the wall with a pencil.
Alternative: If you’re by yourself, you could screw the brackets onto the board first, then hold the board in place and mark bracket positions. We worked as a team so we went with the first approach, it was easier and gives more flexibility for the final positioning of the steel brackets.
2. Wall preparation
Prepare the wall by cleaning it with alcohol and letting it dry.
3. Gluing the brackets
Spread a bit of glue on the steel brackets, enough for it to be ~3mm thick across the whole piece. Press the pieces firmly against the tile and remove any excess glue that comes out on the sides with tissues.
4. Fine-tuning
Now you have about 15min to do any micro adjustments like moving the brackets a bit up or down and tilting them into level. Make sure everything is in the correct place.
5. Stabilization (optional but highly recommended)
Use gaffer tape to fix the brackets in place while the glue is drying. The first time I skipped this step, one of the brackets slid down mid-drying. I noticed it while the glue was still semi-flexible, but when we put weight on the board later, that same piece was sliding down again. On my second attempt, I used gaffer tape and this problem was solved cleanly.
6. Drying
Wait at least 24h to let everything dry.
7. Installing the board
Place the board onto the steel brackets and use a pencil to mark the spots for the screws on the board.
Optional: drill holes into the board to give the screws a better grip. For this I marked the wooden drills with a tape at 13mm to avoid over-drilling. Use a low rotation speed of the drill to avoid any wood breaking
Now, screw the board in place.
8. Testing
Put a load onto the board for the next 24h to test its stability. We’ve used plastic containers like shampoo bottles etc. that are not made of glass in case of any slippage. Once we confirmed everything was stable, we also did a manual pressure test. Rock solid!
Small caveat
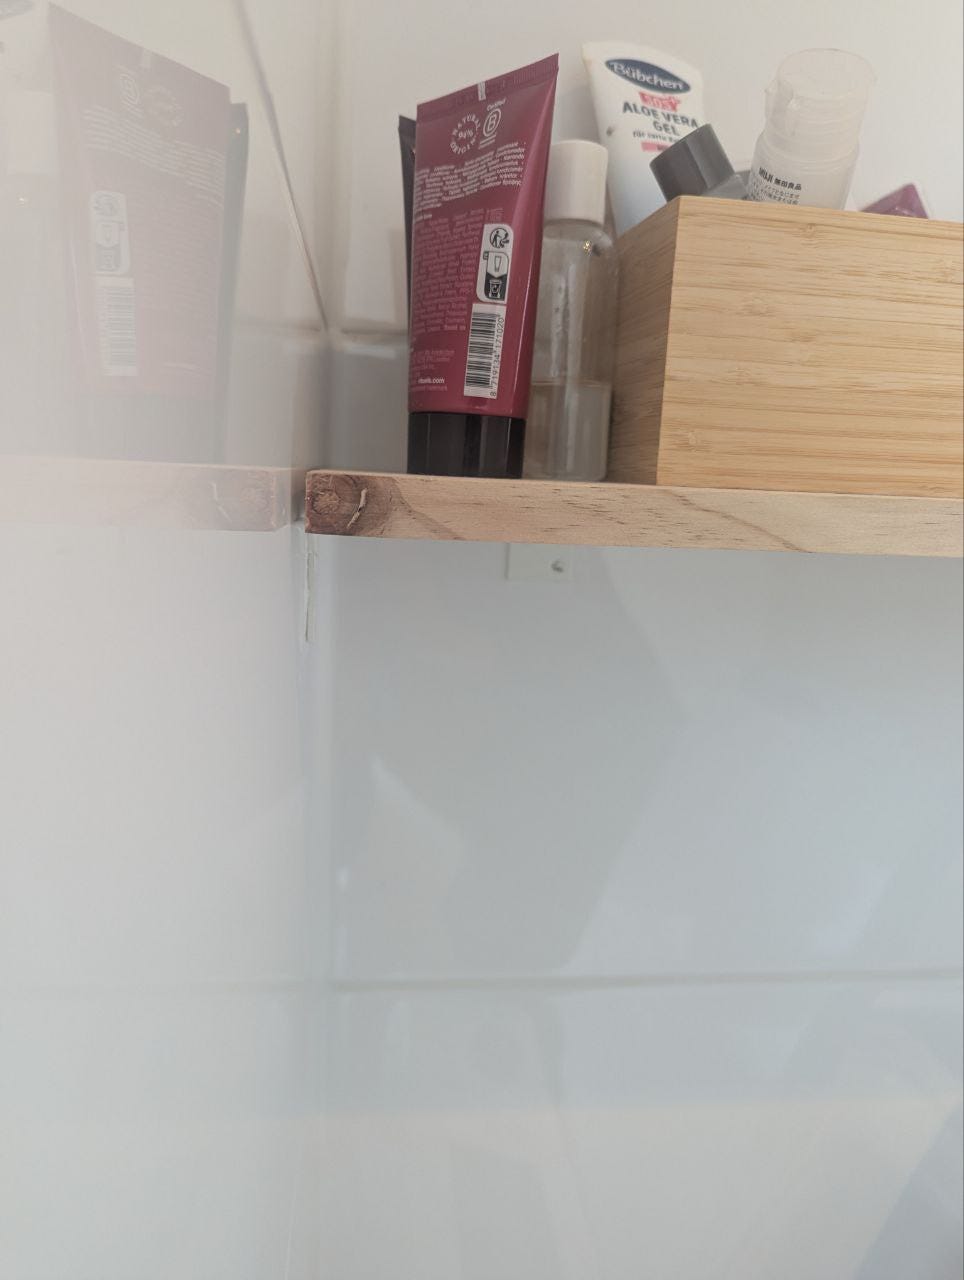
One thing I did not consider initially, was that the board could not be placed fully into the corner. I had to choose one side of the wall that would have a small gap, because of the silicone seal in the corner of the wall. I did not feel comfortable to remove the seal, place the board, and re-seal everything. So I went with the gap. I still think this looks good, but something to keep in mind!
Conclusion
It was fun to apply engineering practices for this DIY project: working under real-life constraints, finding creative solutions, following an incremental approach, working from first principles, testing.
It felt very good to overcome my doubts and add this beautiful improvement to our space. I’m proud of myself and happy with the result!


